Maximizing Space in a 7 x 7 Bathroom Layout Tips and Tricks
7 x 7 Bathroom Layout Maximizing Space with Tips and Tricks is essential for anyone looking to enhance a compact space. At Kitchen And Bathroom Remodeling, we understand that the challenge of a smaller bathroom isn’t just about fitting everything in but doing so stylishly and efficiently. This guide provides practical advice and innovative ideas from our industry experts to help you transform your 7 x 7 bathroom into a functional and attractive space. Whether you’re renovating or just looking to make better use of the area you have, our tips are designed to maximize both style and utility.
7 x 7 Bathroom Layout Tips and Tricks 2024
In 2024, optimizing a 7 x 7 bathroom layout continues to be a popular topic as homeowners look for innovative ways to enhance small spaces. With the right tips and tricks, even the most compact bathrooms can be transformed into efficient, stylish, and comfortable environments. Here are some key strategies to consider:
- Smart Storage Solutions: Utilize vertical space with wall-mounted cabinets and shelves. This helps keep the floor area clear and makes the bathroom appear larger.
- Multifunctional Fixtures: Invest in fixtures that serve multiple purposes, such as a sink with built-in storage or a shower with integrated seating.
- Sliding Doors: Replace traditional doors with sliding doors to save space and improve functionality.
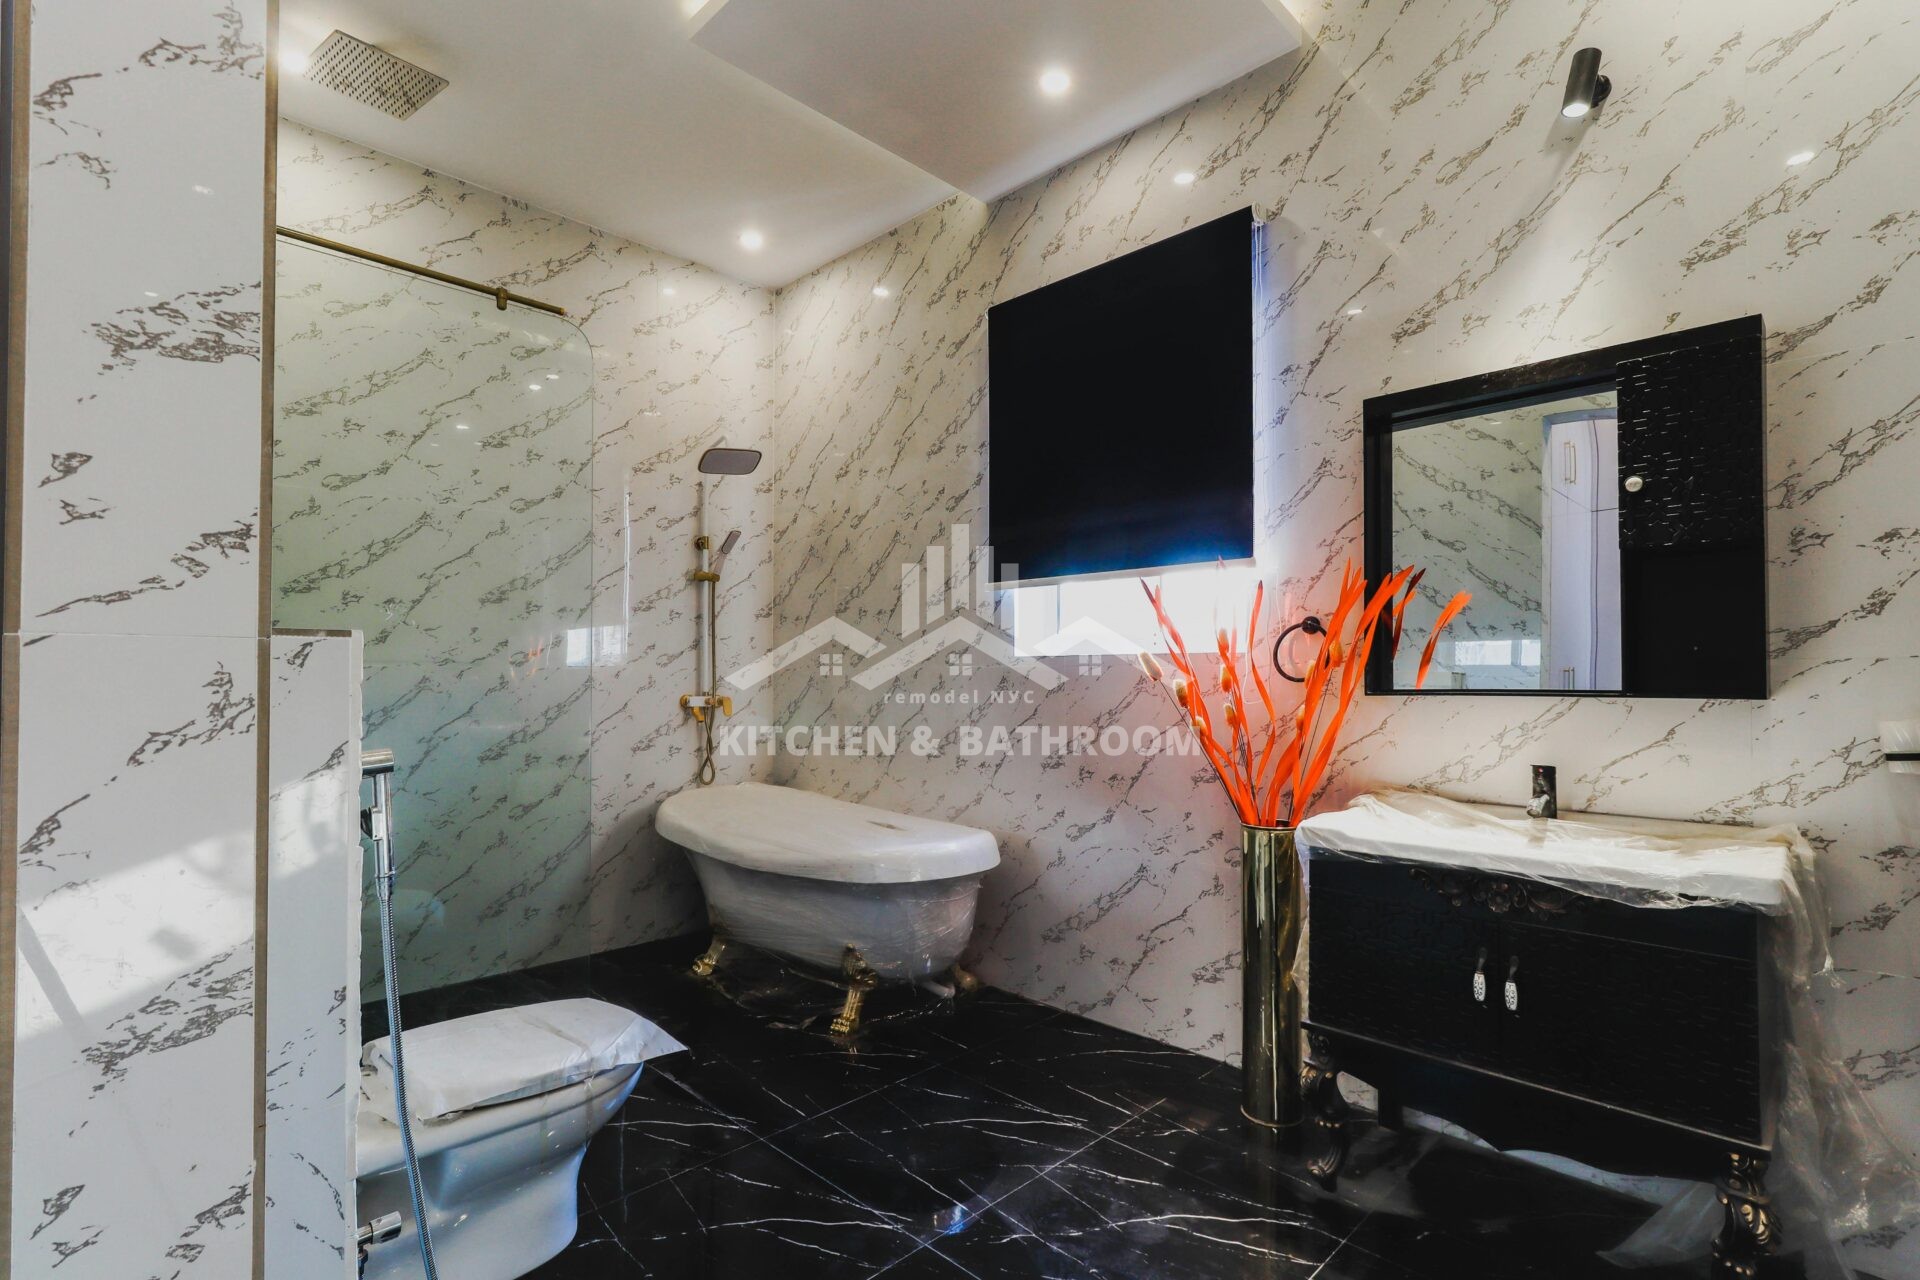
- Lighting and Mirrors: Use strategic lighting and large mirrors to create the illusion of space and amplify natural light.
- Tile Techniques: Choosing the right tile—large format tiles or vertically aligned tiles can make the space feel taller and more open.
- Minimalist Design: Keep the décor simple and the color palette light to enhance the feeling of space.
By applying these tips, your 7 x 7 bathroom layout can become a model of efficiency and elegance, proving that even the smallest spaces can deliver big on style and functionality.

7 x 7 Bathroom Layout Tips and Tricks 2024
Optimizing Space
Optimizing space, especially in smaller homes or specific areas like a compact bathroom or kitchen, requires clever strategies to maximize functionality without sacrificing style. Effective space optimization not only involves using multi-functional furniture and fixtures but also focuses on the layout, storage solutions, and décor that enhance the perception of more room.
Here are key approaches to optimizing space:
- Vertical Storage: Making use of vertical space with tall shelving units, stackable bins, or hanging systems can free up valuable floor space.
- Built-in Furniture: Incorporating built-in furniture, such as benches with storage underneath or custom shelving, can tailor your space to your needs without overcrowding.
- Declutter Regularly: Reducing clutter is essential in maintaining an open and spacious feel. Regular decluttering helps keep only the essentials, ensuring every item has a purpose and place.
- Flexible Furniture: Invest in furniture that can serve multiple functions, like a sofa bed for guests or an extendable dining table. These pieces are especially useful in studio apartments or multi-use spaces.
- Mirrors and Lighting: Using mirrors strategically can make a room appear larger, as they reflect both natural and artificial light. Effective lighting also plays a crucial role, with well-placed fixtures creating a sense of depth and openness.
By focusing on these principles, you can optimize any space, making it feel more expansive and functionally efficient. Whether you’re redesigning a room or simply trying to improve its layout, these strategies can significantly impact your living area’s usability and aesthetic.
The Right Fixtures
Choosing the right fixtures for any room in your home, particularly in areas like the bathroom or kitchen, is crucial for both functionality and aesthetic appeal. Fixtures should not only match the style and theme of your space but also improve efficiency and comfort. Here’s how you can select the right fixtures:
- Functionality First: Consider what you need from each fixture. For example, in the kitchen, a faucet with a pull-out sprayer might be more beneficial than a standard tap if you do a lot of cooking and cleaning.
- Quality and Durability: Invest in high-quality materials that can withstand frequent use. In bathrooms, for instance, choosing non-corrosive and moisture-resistant fixtures can significantly extend their lifespan.
- Style and Cohesion: The fixtures should complement the overall design of the room. Whether you’re going for a modern, minimalist look or a more traditional feel, the fixtures should integrate seamlessly with the decor.
- Energy Efficiency: Opt for fixtures that help save on water and energy. Low-flow showerheads and taps, and LED lighting fixtures, are environmentally friendly choices that can also help reduce your utility bills.
- Proper Sizing: Make sure the fixtures fit the scale of your space. Oversized or undersized fixtures can throw off the balance of the room, making it appear cramped or disjointed.
- Lighting Considerations: In spaces like the bathroom, lighting is not just functional but can also create a mood. Options like dimmer switches or layered lighting can enhance the functionality and ambiance of the space.
By keeping these points in mind, you can choose the right fixtures that will not only look great but also enhance the efficiency and comfort of your living space.
Smart Storage Solutions
Smart storage solutions are essential for maintaining a clutter-free and organized home, especially in smaller spaces or in areas where functionality is as important as aesthetics, like kitchens, bathrooms, and living rooms. Here are some effective strategies for integrating smart storage into your home:
- Vertical Storage: Utilize the height of your rooms with tall shelving units, floating shelves, and hooks. This keeps the floor clear and makes the space feel larger.
- Under-Utilized Spaces: Look for opportunities in under-used areas such as under the stairs, above door frames, or in alcoves. These can be perfect spots for built-in shelving or cabinets.
- Multi-functional Furniture: Choose furniture that offers additional storage. Ottomans with hidden compartments, beds with drawers underneath, and coffee tables with shelves can significantly increase your storage options without taking up extra space.
- Divide and Conquer: Use drawer dividers, storage bins, and baskets to keep things organized inside closets and drawers. This helps segregate items and makes them easier to find.
- Hidden Storage: Incorporate hidden storage solutions like pull-out cabinets, retractable desks, and drop-down tables that can be tucked away when not in use.
- Customized Solutions: Consider custom solutions to fit your specific space and needs, such as bespoke built-ins or tailored closet organizers. These can maximize the efficiency of the space available.
- Declutter Regularly: Adopting a minimalist approach and decluttering regularly can help keep your space tidy and storage efficient. This means periodically assessing what you own and deciding what to keep, donate, or throw away.
By implementing these smart storage solutions, you can create a more organized and serene environment in your home, making the most of every square inch.
Choosing Colors and Textures
Choosing the right colors and textures is crucial for creating a harmonious and visually appealing environment in your home. These elements can influence the mood, perceived size, and comfort of your spaces. Here are some tips for selecting colors and textures that align with your design goals:
- Color Scheme Considerations: Start by selecting a base color that reflects the mood you want to evoke. Soft blues and greens can create a calming effect, while vibrant reds and oranges might energize the space. Neutral tones like whites, grays, and beiges provide flexibility and can make a room feel more spacious.
- Balancing Textures: Introduce a variety of textures to add depth and interest to your rooms. For instance, combining smooth surfaces like polished metal or glass with rougher textures like wool or burlap can enhance the overall aesthetic and sensory experience.
- Complementary Colors: Use a color wheel to find colors that complement your primary choice. Complementary colors are opposite each other on the wheel and can create a vibrant look when used together, yet it’s important to balance them so one color doesn’t overpower the other.
- Layering Shades: Experiment with different shades and tints of your main color to add sophistication and variety. Layering similar colors can create a subtle and cohesive look.
- Accent Elements: Choose accent colors for smaller areas or accessories. These can be bold or contrasting colors that bring life and energy to the room. Accents are great for highlighting features or adding pops of color.
- Testing Your Choices: Before finalizing your decisions, test paint colors and fabric textures in the space. Observing how they change under different lighting conditions throughout the day can help you avoid unexpected results.
- Sensory Balance: Consider the tactile qualities of the textures you select. For instance, in a bedroom, soft, plush textures can enhance comfort, while in a home office, smoother, firmer textures might be more appropriate.
By thoughtfully selecting colors and textures, you can create a cohesive and inviting atmosphere in your home that reflects your personal style and meets your functional needs.

Lighting Your Space
Lighting Your Space
Lighting is a critical aspect of home design, impacting both the aesthetics and functionality of your space. Effective lighting can transform the atmosphere, make rooms feel more spacious and comfortable, and even influence mood and well-being. Here’s how to master the art of lighting your space:
- Layer Your Lighting: Incorporate a mix of ambient, task, and accent lighting to create a flexible and functional environment. Ambient lighting provides overall illumination, task lighting focuses on specific areas for activities like reading or cooking, and accent lighting highlights architectural features or artwork.
- Consider the Room’s Purpose: Tailor your lighting choices to the function of each room. For instance, a kitchen requires strong, direct lighting for safety in cooking, while a bedroom benefits from softer, more diffuse lighting to promote relaxation.
- Optimize Natural Light: Make the most of natural light by keeping windows clean and clear of obstructions. Use light-colored curtains or blinds to diffuse light without completely blocking it, enhancing the natural feel of the room.
- Choose the Right Bulbs: Select light bulbs that offer the right color temperature for your needs. Warmer lights (2700k-3000K) are inviting and relaxing, making them ideal for living areas and bedrooms, while cooler lights (3500-5000K) are energizing, suitable for bathrooms and kitchens.
- Use Dimmers: Installing dimmers allows you to adjust light intensity based on the time of day or the activity, adding flexibility and helping to save energy.
- Highlight Textures and Colors: Use directed lights, like spotlights or track lighting, to enhance textures and colors in your décor. This can draw attention to the best features of your room.
- Consider Fixture Styles: The style of light fixtures should complement the room’s decor. Modern spaces may benefit from sleek, metallic fixtures, whereas more traditional spaces can use ornate lamps or chandeliers to add character.
- Plan for Safety: Ensure that all areas, especially stairways and hallways, are adequately lit to prevent accidents. This includes having well-lit paths to entrances and exits.
By carefully planning and implementing your lighting, you can significantly enhance the comfort, functionality, and aesthetic appeal of your home.
Ventilation Essentials
Proper ventilation is crucial for maintaining a healthy and comfortable living environment. Effective ventilation helps to reduce indoor pollutants, control moisture, eliminate odors, and bring in fresh air, contributing to better air quality and the overall well-being of occupants. Here are some essential tips for optimizing ventilation in your home:
- Use Natural Ventilation: Whenever possible, utilize natural ventilation to improve indoor air quality. Open windows and doors to create cross-ventilation, allowing fresh air to flow through your home and stale air to escape. This is particularly effective in climates where outdoor air temperatures are comfortable.
- Install Exhaust Fans: In areas where moisture and odors are more prevalent, such as kitchens and bathrooms, install exhaust fans. These fans help to expel humid air, odors, and pollutants directly outside, preventing mold growth and indoor air pollution.
- Maintain Your HVAC System: Regular maintenance of your heating, ventilation, and air conditioning (HVAC) system is essential. This includes replacing filters, cleaning ducts, and ensuring that all components are functioning efficiently. A well-maintained HVAC system circulates clean air throughout your home and can be equipped with filters that remove particulates from the air.
- Consider Mechanical Ventilation: In homes where natural ventilation is limited, consider installing a mechanical ventilation system. Systems like Heat Recovery Ventilators (HRVs) or Energy Recovery Ventilators (ERVs) are particularly effective as they exchange indoor and outdoor air while conserving energy.
- Use Window and Attic Fans: Window and attic fans can be an effective way to remove hot air from your home and draw in cooler air from outside, especially during the cooler parts of the day or night.
- Control Humidity Levels: High humidity can lead to condensation and mold growth, which are harmful to both your health and your home. Use dehumidifiers in damp areas, and ensure that your ventilation strategies effectively remove humid air.
- Incorporate Plants: Indoor plants can improve indoor air quality by absorbing certain pollutants and emitting oxygen. They also add moisture to the air and can help in maintaining healthy humidity levels.
- Educate Yourself on Ventilation Standards: Familiarize yourself with local building codes and standards for ventilation. These standards are designed to ensure that ventilation systems meet minimum requirements for health and safety.
By implementing these ventilation essentials, you can help ensure that your home remains a safe, comfortable, and healthy environment for everyone.
Floor and Wall Continuity
Floor and wall continuity is a design technique that can visually expand a space and create a seamless aesthetic flow between surfaces. This approach involves extending the same or similar materials from the floor up the walls, often used in bathrooms, kitchens, and modern living areas to enhance the overall ambiance and give the illusion of a larger room. Here’s how to effectively achieve floor and wall continuity in your home:
- Choose the Right Material: Select materials that work well both horizontally and vertically. Common choices include porcelain and ceramic tiles, natural stone, and polished concrete. These materials are durable and can handle the transition from floor to wall gracefully.
- Consistent Patterns and Textures: When extending the floor material up the walls, ensure that the pattern, grain, or texture flows seamlessly. This might mean matching veining in marble or the grain in wood-look tiles from the floor onto the walls.
- Color Coordination: Maintain a consistent color palette to unify the space. Using varying shades of the same color can add depth while keeping the overall design coherent. Lighter colors typically make a space feel bigger and hairier.
- Proper Installation: Ensure that the transition between the floor and the wall is well executed. This might involve careful cutting and fitting of materials, especially around corners and edges. The precision in installation will impact the overall finish and effectiveness of the design.
- Scale and Proportion: Consider the scale of the tiles or panels when planning the layout. Larger tiles can make a small room feel bigger, but they must be proportionally suitable for the wall surfaces they will cover.
- Waterproofing and Sealing: Particularly in wet areas like bathrooms, it’s crucial to ensure that the materials used on the floors and walls are properly sealed and waterproofed to prevent moisture damage and mold growth.
- Highlight Architectural Features: Use floor and wall continuity to highlight key architectural features or areas within the room, such as a shower area or a backsplash in the kitchen.
- Balance with Décor: Since floor and wall continuity can dominate a space, balance the look with softer decor elements like fabrics, rugs, and wood to add warmth and texture.
This design strategy not only enhances the visual appeal of a space but also contributes to a sense of luxury and openness. With thoughtful selection and expert execution, floor and wall continuity can transform the ambiance of any room.
FAQ’s 7 x 7 Bathroom Layout
What are the rules of bathroom layout?
Ensure that there is a minimum of 30 inches of clear floor space from the front edge of all fixtures, including the lavatory, toilet, bidet, tub, and shower, extending to any opposing bath fixture, wall, or obstruction. Building codes mandate that at least 21 inches of space be available in front of the lavatory, toilet, bidet, and tub.
What is the perfect bathroom size?
Although the minimum size for a full bathroom is 40 square feet (8×5), this dimension often feels tight and can make the bathroom appear cramped. A more comfortable and commonly accepted standard size for a full bathroom is about 60 square feet (6×10), which is considered the most efficient layout for usability and comfort.
Is 5x7 big enough for a bathroom?
A 5×7 bathroom offers 35 square feet of space, which is on the smaller side as it cannot accommodate all the features of a full bathroom. Nonetheless, this area is sufficient to include a shower or bathtub, sink, toilet, and a compact vanity. Be aware, though, that fitting all these elements might make the space feel somewhat cramped.
What is the size of a luxury bathroom?
Luxury Master Bathroom Size: Typically, any bathroom over 120 square feet is considered large. The classification of luxury master bathrooms usually depends on both the size of the room and the quality of materials used.
How much space for a toilet?
Toilet: Ensure there is a minimum clearance of 21 inches in front of the toilet. For placement, maintain at least 15 inches of space from the center of the toilet to any wall or adjacent object.
Conclusion
Maximizing space in a 7 x 7 bathroom layout effectively requires insightful design strategies and smart fixture selection. At Kitchen And Bathroom Remodeling, we specialize in optimizing small spaces with creative and functional solutions. If you’re considering a renovation or want to improve your existing setup, visit our headquarters at 2095 Jericho Tpke, E Northport, NY, 11731, or contact us at (646) 933-5555. You can also email us at nyconstruction.dn@gmail.com for more details or to arrange a consultation. Let our team help you transform your compact bathroom into a beautifully efficient space.